Compass Basics
Useful Links
Downloadable Guide
![]() Compass Rose by Graham Williams, 12th Andover West
Compass Rose by Graham Williams, 12th Andover West
Choosing a compass
Choose your compass with care. The most appropriate type for use in scouting is probably the orienteering compass. A good one will have a well balanced steel magnetic needle that settles into position quickly. The needle should be coloured differently at each end, usually red at the north end. If the tip glows in the dark then even better.
The base plate and dial are usually strong plastic. The dial will have increments of around 2° marked clearly. On the dial itself will be faint meridian lines (faint parallel blue lines pointing in the same direction as north on the dial). Some even have extra information such as magnetic variation or declination degrees marked on the dial. The dial also has an arrow marked on the bottom aligned with north on the dial.
The base plate should be transparent and have scales in both metric (cm and mm) and imperial (inches). A magnifying glass, clinometer, sighting mirror and adjustable declination screw are all welcome extras.
Don't forget a strong strap attached to the base plate which should be securely held at the other end to your shirt pocket buttonhole or around your neck.
There are several different types of compass available. These may range from the simple 'toy' compass which has a fixed dial to the more technical prismatic compass. Here we will concentrate on the most suitable compass for scouting, the orienteering type compass.
Why is it spinning like that?
Because a compass is based upon a magnet the needle can be affected by magnetic fields and materials such as iron. For instance your belt buckle, a zip, karibiner. Even mineral deposits in the ground can offset your compass. Don't just look down either. Look around and above you. Sitting under a power line or near an electric motor will not do you any favours.
Typical compass

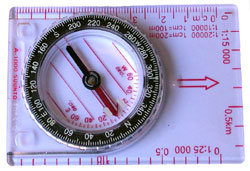
A typical (Silva type) compass consists of a magnetic strip of metal, suspended or pivoted (so it can swing freely) within a moveable dial. The dial is usually liquid filled (this dampens the oscillation of the needle allowing it to settle into position much more quickly) and has several parallel lines marked on the dial itself. The compass should have a clear plastic base plate with straight edges. Along the edges should be scales in both metric (cm and mm) and imperial (inches). Some may have additional features such as a magnifying area and degrees of declination/magnetic variation (usually marked on the compass dial). A wrist strap is another important feature if you want to keep the compass.
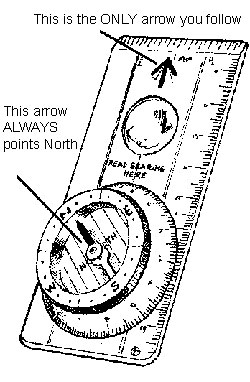
There are usually 3 different types of arrow marked on the compass. As indicated in the diagram, the vertical arrow marked on the plastic background is your direction of travel arrow. This is the only arrow you ever follow.
The arrow that spins in the middle of the compass (usually coloured red and white) always turns to point north (the red end is the end that points north). NEVER follow this arrow (because you will always be walking north then, no matter where you actually wanted to go!) When using a compass try not to hold it near any metal or any magnets else this arrow will be attracted to them and you will end up going in the wrong direction. Depending on where you are simply placing the compass near the floor may give you an inaccurate reading due to iron and mineral deposits in the ground. Always check you have the same reading at ground level and when standing up.
The third arrow is the one that will be marked upon the dial. (you cant actually see this on the picture). It is usually a red arrow marked on the bottom of the dial. This is the one that will match up with the red and white pointer that spins. When you want to read a number off the dial, look at the point where it touches the line at the top (the one marked by ‘read bearing here’), this is the number you want.
NOTE: There are 360 degrees in a circle. Be careful about how many degrees each line on the compass represents. Normally on compasses of this type each line is ‘worth’ 2 degrees. This is important as a difference of 5 degrees over a walk of 6 miles will mean you will be about half a mile from where you should be!
Compass Points

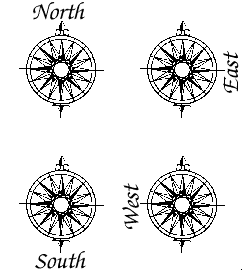
All you have to remember are the four main points of the compass. All the other points are made by combining these four. (for instance halfway between north and east is northeast).
Some silly ways to remember the order of the points are to recall the following phrases. The points start at the top and go around clockwise.
Never Eat Shredded Wheat
Naughty Elephants Squirt Water
If you wish to quote a more accurate direction you can either opt for a more complicated compass point;
North by Northeast is a position halfway between north and northeast. Note that the convention for naming points of this type is to quote the 'more important' compass point first. For example, halfway between southwest and west would be called West by Southwest (and not Southwest - West).
or you can resort to quoting an angle measured clockwise from North (in degrees);
Recall there are 360° in a circle. So North would be 0°. East would be 90°. South - 180° and West 270°. As another example, Northeast would be 45° (halfway between north and east).
The advantage of quoting in degrees is speed and accuracy (a direction of 208° is not an obvious compass point!). This is related to bearings.
